The quick answer: trace shapes, do not wrap pixels
To convert a PNG to a real SVG, start with the cleanest available PNG, remove any unwanted background, trace the visible design into paths, simplify the result and reopen the exported SVG. A true vector conversion represents the important artwork with shapes such as paths, polygons and circles instead of relying on one embedded bitmap.
Do not convert every image. Photographs, painterly gradients, soft shadows and heavily textured AI art usually remain more faithful as high-resolution PNG files. Vectorization is most useful when the design depends on crisp silhouettes, flat fills, editable colors, clean lettering or a cut line.
Practical note: The current product template is the final authority. Some providers require a transparent PNG even when the editable master is SVG.
How to tell a true vector from a PNG inside an SVG
SVG is a document format that can contain vector shapes, text and raster images. The SVG image element can display a PNG or JPEG inside the document, so the .svg extension alone does not prove that the artwork is scalable vector geometry. If the file contains one image that becomes blurry when enlarged, the conversion only changed the container.
A true vector reconstruction contains editable shapes. In a vector editor you should be able to select individual paths, inspect nodes, change fills and scale the artwork without exposing a fixed pixel grid. Mixed files can be legitimate, but the raster portion still has a finite resolution.
| Inspection | True vector result | Bitmap wrapper or weak trace |
|---|---|---|
| Object panel | Multiple intentional paths or shapes | One image object fills the canvas |
| Node editing | Curves and corners have editable nodes | No editable geometry for the artwork |
| Extreme zoom | Edges stay geometrically clean | A pixel grid or softened bitmap edge appears |
| Color editing | Fills can be changed independently | Colors are locked inside one image |
| File complexity | Paths match meaningful design regions | Thousands of noisy fragments copy every pixel variation |
Example: the same artwork as a small PNG and true paths
The left panel uses a deliberately small 128 × 128 PNG enlarged by the browser. The right panel uses the same original KreavoPod demonstration artwork rebuilt as SVG paths. This is the difference a useful conversion is trying to create: editable geometry rather than a larger box around the original pixels.
The path version is not automatically more accurate. Its value depends on whether the traced curves, corners, enclosed holes and color regions still match the intended design. Always compare the output with the source at normal viewing size and high zoom.

Choose a PNG that can survive vectorization
Automatic tracing follows the information in the source, including its mistakes. Compression blocks can become stair-stepped paths, background fringes can become extra outlines and tiny color variations can become separate objects. Use the largest, cleanest source available and fix visible defects before tracing.
A simple design with four intentional colors may need four or a few more meaningful shapes. A photograph can require thousands of paths to imitate continuous tone and still look worse than the original PNG. Complexity is a signal to keep the design raster or rebuild selected elements manually.
- Strong candidate: logo, icon, bold mascot, simple lettering, stencil or flat geometric illustration.
- Possible with cleanup: anti-aliased edges, a modest number of spot colors or light distressing.
- Weak candidate: photograph, watercolor, realistic lighting, soft transparency or detailed painted texture.
- Repair first: JPEG blocks, blurry text, accidental background, halos, stray pixels and malformed AI details.
How to convert PNG to SVG, step by step
First duplicate the original PNG and decide what the SVG needs to preserve: the full-color design, a reduced spot-color version or one cut silhouette. Crop unnecessary canvas and remove only the background that should not become a path. Keep intentional interior white areas and enclosed holes.
Trace the cleaned source with a mode suited to the output. Use color tracing for filled artwork and silhouette tracing for a single cut shape. Start with a low color and detail setting, then add complexity only when the design visibly needs it. The goal is not to reproduce every pixel; it is to preserve the intended forms.
Compare the trace with the PNG, simplify false bumps and merge near-duplicate colors. Reopen the downloaded SVG in a second viewer or vector editor. Inspect the actual paths, not only the converter preview, then retain an editable master and create a production-specific export.
- Define the output: editable color artwork, print master or cut silhouette.
- Clean the PNG and preserve an untouched source copy.
- Choose color or silhouette tracing deliberately.
- Use the lowest detail and color count that preserve the design.
- Inspect curves, corners, holes, small islands, lettering and negative space.
- Download, reopen and edit the exact SVG export.
- Export the format and dimensions required by the current provider.
Simplify paths without damaging the design
More nodes do not automatically mean a more accurate SVG. Excess nodes make curves harder to edit, enlarge the file and can reproduce compression noise. Simplify until the path becomes easy to control, then undo or refine locally if a meaningful corner or curve changes.
Treat lettering and trademark-sensitive details as manual inspection zones. Automatic tracing can close counters inside letters, deform punctuation and create irregular baselines. When editable source text exists, use it instead of tracing flattened letters and resolve fonts according to the production workflow.
| Result | What it looks like | Correction |
|---|---|---|
| Too little detail | Corners disappear and shapes merge | Increase detail slightly or repair the important path manually |
| Too much detail | Edges wobble and node count explodes | Reduce detail, clean the source and simplify paths |
| Too many colors | Near-identical fills form thin bands | Merge the palette into intentional production colors |
| Lost holes | Counters and negative spaces become solid | Restore compound paths or subtract the missing openings |
| Unsafe islands | Tiny detached shapes may not print or cut | Join, enlarge or remove them according to the process |
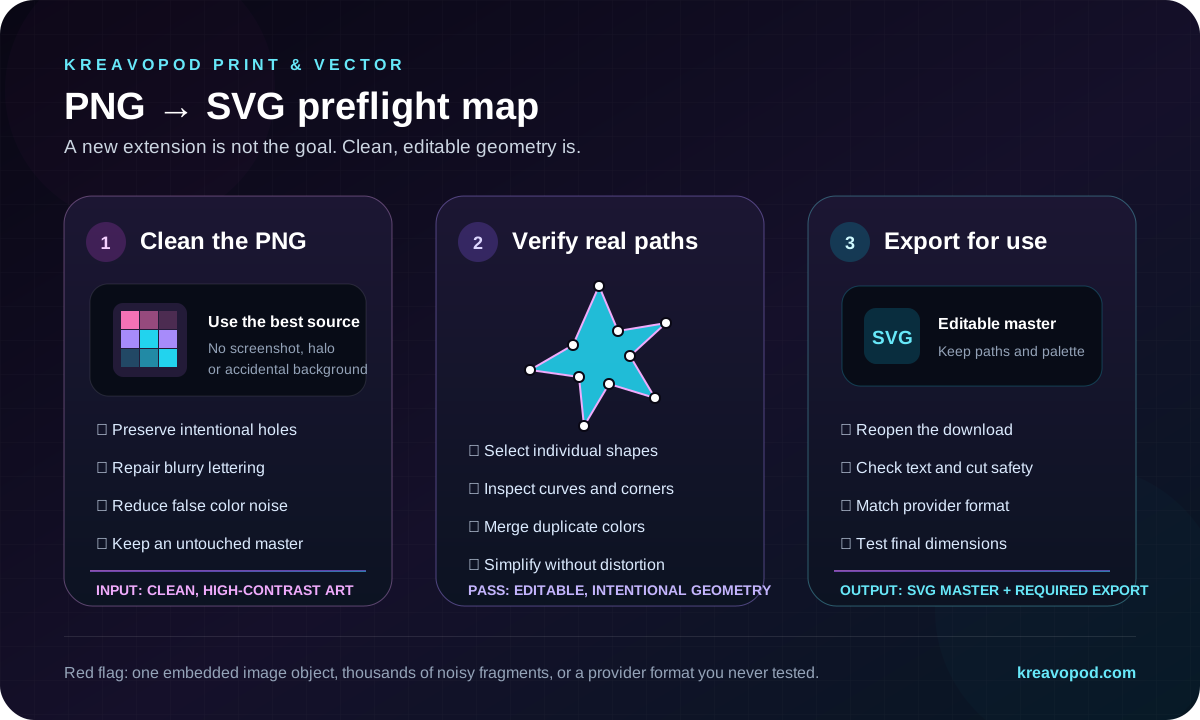
Use this PNG-to-SVG preflight map
A conversion is complete only after the exported file survives structural, visual and production checks. Use the map below after every trace, especially when the SVG will be used for cutting, spot colors or reusable logo artwork.
Prepare the SVG for printing or cutting
For printing, confirm that the color regions, transparency and physical dimensions match the production method. A provider may still request a transparent PNG export from the vector master. Rasterize at the required pixel dimensions only once, inspect the result and keep the SVG as the editable source.
For cutting, prioritize one clean outer silhouette, deliberate interior cutouts and material-safe feature sizes. Remove duplicate paths, open contours and small floating islands. Test the SVG in the actual cutting software because import behavior, units and supported effects can differ.
Common PNG-to-SVG mistakes
The most common failure is assuming that a successful download means a successful vector. Open the file and inspect its contents. Another common failure is tracing a marketplace thumbnail or screenshot instead of returning to the original artwork. A converter cannot reconstruct accurate structure from an already damaged source.
- Renaming .png to .svg or exporting a bitmap inside an SVG wrapper.
- Tracing a photograph into thousands of paths without a production reason.
- Preserving the background, halo and compression noise as vector objects.
- Using maximum colors and detail because the file looks smoother at fit-to-screen zoom.
- Ignoring text deformation, closed letter holes and detached punctuation.
- Sending SVG to a provider that asks for another format without testing the export.
- Assuming vector artwork has a fixed DPI instead of checking the final rasterized output when applicable.
Final SVG checklist before production
Keep the source PNG, editable SVG master and production export as separate files. Reopen each deliverable and verify it at normal size and high zoom. A clean master should make future edits easier, not merely change the extension shown in a file browser.
- The SVG contains intentional vector paths rather than one accidental bitmap object.
- Silhouette, corners, curves, enclosed holes and negative space match the source.
- Colors are intentional and near-duplicate trace fills are removed.
- Text, punctuation and small design details are accurate.
- Path and node counts are manageable for the artwork.
- No unwanted background, fringe, stray objects or duplicate paths remain.
- Cut shapes are closed and small features are safe for the material when relevant.
- The final provider format, dimensions and transparency have been checked separately.
Frequently asked questions
Can I convert PNG to SVG without losing quality?
You can rebuild suitable flat artwork as scalable paths, but automatic tracing is an interpretation of the PNG rather than recovery of an original vector. Compare the trace with the source and repair inaccurate paths before production.
Does renaming a PNG file to SVG make it vector?
No. Renaming the extension does not change pixel data into paths. An SVG can also contain an embedded PNG, so inspect the objects inside the file instead of trusting the filename.
What PNG images are easiest to convert to SVG?
Flat logos, bold shapes, icons, simple lettering and illustrations with a small intentional palette are strong candidates. Photographs, painterly gradients and detailed texture are usually better preserved as high-resolution raster files.
Why is my converted SVG file so large?
The trace may contain too many nodes, colors or small objects, or it may include an embedded bitmap. Clean the source, reduce detail and palette complexity, then inspect and simplify the actual paths.
Can print-on-demand platforms print SVG files?
Accepted formats vary by provider, product and workflow. Keep SVG as an editable master when it suits the artwork, then export the current provider's requested format and dimensions.
Is SVG better than PNG for DTF or T-shirt printing?
Not universally. SVG is useful for clean editable shapes, while PNG is usually better for full-color texture, gradients and soft detail. The production provider may request a transparent PNG even when the design was created from a vector master.
Convert the PNG in KreavoPod Print & Vector
Trace flat artwork into color paths or a cut silhouette, inspect the result and download an editable SVG for the next production step.
Open resource →